I recently put together my first “papercraft” model: an excellent depiction of an iconic image from my favorite Studio Ghibli movie. There are various types of papercraft, with some looking like “traditional” plastic or wooden models as 3D representations of their subjects. This type is instead a series of flat, different colored sections with designs cut out that create a layered image when placed one behind the other with small spacing between the layers.


The envelope for this comes with directions and several mini sheets of sturdy paper with designs cut into them. Some models are marked with “English instructions included,” but this one only had Japanese instructions. But the pictures show all the pieces needed at each step and the pieces are labeled on their punchcards with the “layer” they belong on so there’s sufficient guidance provided to complete the model even with the language barrier.


I did look up English directions for a similar papercraft and the only thing that would have been overlooked otherwise is a wise suggestion to apply glue the “non-visible” side of whatever is being glues together (so to the base layer if attaching a piece to the back of the layer, and to the back of the piece if it’s being glued to the front of a layer), and the suggested tool list which I’ll discuss below.
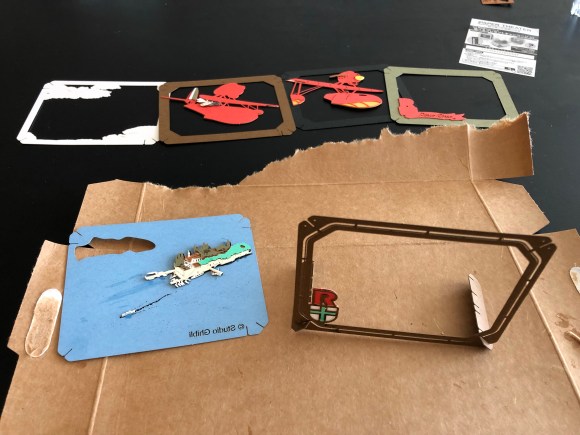
To achieve minor visual details that really bring the image to life some of the pieces are TINY and admittedly quite difficult to cut out, keep intact, and paste together. So while for the first few pieces it seemed I’d be ok just using my hands and the hobby glue bottle directly, the additional recommended tools of an exacto knife (for removing the small pieces from the punchcards), tweezers (to hold and position pieces), and toothpick and/or small glue brush (for applying glue) are essential. One or two pieces were so small and delicate I almost destroyed them, but it all worked out in the end and wasn’t difficult to put together overall with some patience and care. It took me about an hour and the result looks fantastic.
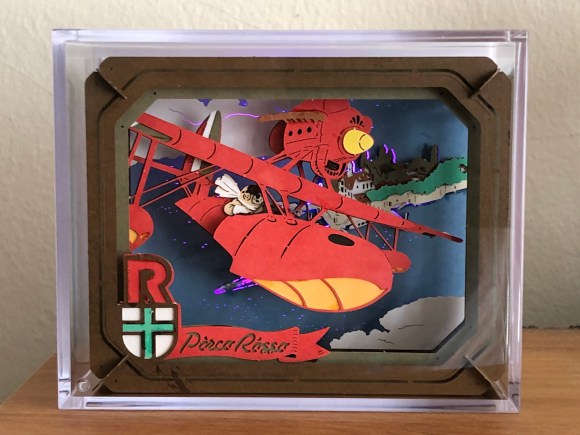
While the model is nice and stable once together and doesn’t require a case, they are available and I’m happy with having a bit of protection against both damage and dust as well as how it looks. I got a light up version for this one and the soft, alternating color lights poking through the tiny exposed areas in the completed piece looks amazing. Really pleased with this and will likely try more in the future.
